Calendars are fairly straight forward with SharePoint. They are identical in every level of licensing though the version (2007, 2010, or 2013) can change the interface and functionality a little. To add a calendar to a page, you’ll need to have site owner level access.
Create a new calendar
- Open your SharePoint site or the sub-site on which you would like to create the calendar and click on “Site Contents” in the quick launch menu usually on the left hand side.
- Choose “add an App”
- Click on “Calendar” and name it. This will take you back to the apps screen.
- The new app will be labeled new. Click on the … and “settings” above the new app to edit the calendar.
From settings, you can manage your calendar and events with a few options. Here are some highlights.
- General Settings – Name, Description, and add it to the Quick Launch Bar
- Versioning Settings – Content Approval, Item versioning, and Visibility of draft items.
- Advanced Settings – Content Types, Visibility in Search, Offline visibility
- Delete This List
- Workflow Settings – Create and manage workflows
- Metadata and Keyword Settings – Allows for tagging to improve searching
You can also add columns or metadata and use content types. These columns are useful for creating different views of the same calendar. By default, start time, end time and title are required. You can add any field you can imagine to the list and make it required or not.
Adding your calendar to the site
Once you’ve created your calendar you can add it to any page within the same sub-site by navigating to the page on which you want to place the calendar, clicking on “Edit”. Then under the “Insert” tab, choose “web part”, and select your calendar. The default view of your calendar will appear.
Working with Events
To add a new event, click on the corresponding date on the calendar, and then click on the “+ add” that appears in the bottom right hand corner of the day. You can also add events by clicking on “Events” and “New Events” under the calendar tab.
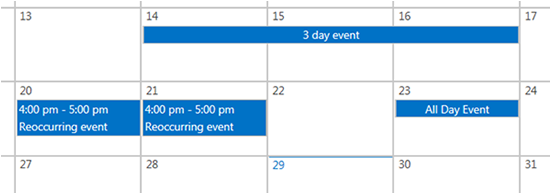
Whe the new event form pops up, fill in whatever metadata (columns) you set up in Calendar settings. By default, only Title, Start Time, and End Time are required. Notice that you can set up All Day Events and Recurring events from this screen too. These appear on the calendar like this.
*Tip- When editing a recurring event, click on the event title for any of the dates and then choose “Edit Series” from the ribbon. “Edit Item” will only make changes to that specific date.
To edit an event, click on the event title and then choose “Edit Event” from the ribbon at the top. You can also delete the event from that menu.
Changing Event Colors
Without the use of SharePoint Designer, all of the events on a calendar will be the same color. There is no way to make one event one color and another event a different color, without using a calendar overlay.
Calendar overlays allow different types of events to be different colors.
Permissions with calendars
There are several levels of permissions with calendars.
- Site owners – Create a new calendar, add it to a page, create views, set the default view, delete the calendar, and everything below.
- Editors – Add events, Edit events
- Viewers – View the entire calendar, open events they have permission to view, Connect with Outlook Calendar
SharePoint Calendar Help
See the other posts in my SharePoint Calendar Series

[…] Basic SharePoint Calendars […]
[…] Basic SharePoint Calendars […]
[…] ← Basic SharePoint Calendars Announcements, Updates, News, and Alerts → May 15, 2015 · 9:16 am ↓ Jump to Comments […]
[…] Basic SharePoint Calendars […]
[…] Basic SharePoint Calendars […]