 Companies needing to manage several different related calendars can use a SharePoint Calendar overlays to view them stacked atop one another at the same time. Calendar overlays are useful for conference room schedules, project schedules, or in any situation in which calendars from various sites need to be aggregated in the same place.
Creating a SharePoint Calendar Overlay
In most cases, you’ll want to start an overlay by creating a dummy host calendar, because adding an overlay to an existing calendar will change the default view to include the overlaid events. You’ll also need to have already created the calendars that will be overlaid. Standard and Datasheet views cannot be overlaid, so you’ll need the calendar view for each of these calendars.
To start, navigate to your host calendar and:
- Click on the Calendars Overlay button under the Calendar tab. Then, select New Calendar.
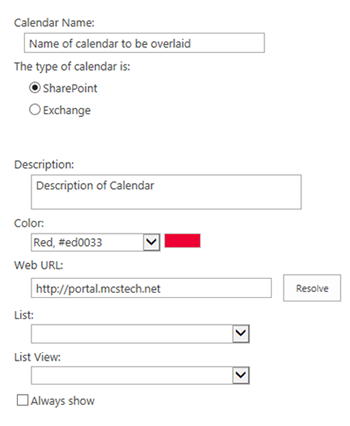
 Write a name for the first calendar you want to overlay. This name does not need to match the official title of the calendar. It can be anything. The name will only be used in the key that identifies which colors are used for which calendars in the Overlay.
- Assuming that the calendar is a SharePoint calendar, make sure that radial button is selected. Exchange calendars can also be overlaid into SharePoint.
- Change the color if you would like. Overlaid calendars show their events in different colors to make them easier to read.
- Confirm the URL for the sub-site that includes the calendar is correct and click on the Resolve button.
- Then under List (SharePoint Calendars are technically lists) select the correct calendar and list view (otherwise known as custom view).
- Check the box to Always show if appropriate and click OK.
- Click OK again.
SharePoint will allow up to 10 calendars to be added.

Calendar Overlay vs. Filtered Calendars
A very similar functionality can be accomplished using filtered calendars. For example, instead of stacking 6 different conference room calendars into one overlay, you could create a single calendar with a required column field for “Room Number” and then create filtered views for each of the conference rooms.
This seems like 6 of 1 or half dozen of the other, but there are several pros and cons to this method.
Pros to using columns instead of overlays
- A single calendar is easier to manage. All of your data is stored in one easy to find place.
- Gantt, worksheet, and standard views that turn the calendar into a list would include all of the events. In the case of an overlay, only the host calendar’s events will be shown.
- You can connect to the entire calendar in Outlook, whereas you would need to connect to each overlaid calendar individually.
Cons for using columns instead of overlays
- Without SharePoint Designer, every event will be the same color in a filtered column calendar. Overlaid events are usually different colors, making the calendar easier to read.
- Overlaid calendars can come from any sub-site or even exchange. A filtered calendar lives on only one sub-site. For example, if you need a project calendar that summarizes all of the project dates on every project sub-site, an overlay would be necessary. That way you could also view each particular project calendar on each project sub-site. (Though you could, technically, overlay a filtered view of a master calendar onto sub-sites too.)
- When using filtered columns, metadata would need to be added on each event. To add a new event you would have to manually enter the determining metadata that creates the view. New events added from Outlook would need to be manually updated in SharePoint. With calendar overlay, by virtue of it being an addition to a specific calendar, the metadata is assumed. For example, if you add an event to Project #4, then the overlaid calendar and the separate calendar are automatically updated without the use of metadata.
View calendars from other sub-sites with Calendar Overlay
The well-known and sometimes frustrating barrier that prevents easily referencing calendars from other sub-sites can be circumvented with calendar overlays. If you want a calendar from a different sub-site to show up on a page, create a dummy calendar and then overly only the calendar from the different sub-site on the dummy calendar.
For example, if you are creating a client portal, and the client needs to see a filtered view of just the major milestones of a project, you can accomplish this by overlaying a customized view of the project calendar on a dummy calendar in the client portal.
SharePoint Calendar Help
See the other posts in my SharePoint Calendar Series

[…] SharePoint Calendar Overlays […]
[…] SharePoint Calendar Overlays […]
[…] SharePoint Calendar Overlays […]
[…] SharePoint Calendar Overlays […]
[…] SharePoint Calendar Overlays […]