 Companies sometimes create several documents together, as in the case the documents for a new project or a new employee. SharePoint Document Sets collect these standard groupings of documents together to make them easier to organize and find. A document set in SharePoint is a customized “folder” in which related documents can be stored.
As an example, a company may need a folder of documents for every new project. These documents might include templates for work orders, change order requests, invoices, status reports, etc. Storing them in a document set with standard metadata and templates helps keep them more organized.
 Each of these documents in the document set may need to be customized to have the client’s name, phone number, address, and some other information. SharePoint can automatically populate this information into the templates.
Vandelay Project File Management System
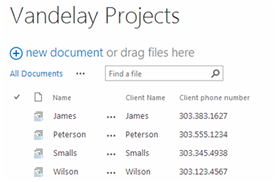
As an example, I created a set of documents for a fictional client, Vandelay Industries, who needs help organizing projects. Their project document sets are stored in a document library called Vandelay Projects. Each client has their own document set with standard templates and metadata.
 If I open up the Wilson document set (For Vandelay’s biggest customer Wilson Co.), I can see a list of Contracts, Work Orders, Updates, and a Non-Disclosure agreement. These documents came from templates that are shared by all clients in all document sets.
The templates automatically populate with information about the client like their name and phone number, so that I don’t have to fill that out every time.
To create this project I used Content Types, Document Sets, Site Columns, some other standard functionality, and Quick Parts in Microsoft Word.
 Content Types
To accomplish this project, we’re going to have to rely heavily on content types. Content types are standard kinds of content that can be reused on the SharePoint site. A content type might be a standard document template, a standard set of columns for new tasks, or a standard workflow. A new document, for example, is a content type, albeit a very plain one.
We’re first going to create a parent content type to hold all of the child content types for Vandelay’s sales department.
- First navigate to the highest level of your SharePoint deployment that needs access to these types. Every sub site below this level will have access to the content type.
- Click on the Gear in the top right corner and choose Site Settings.
- In the Web Designer Galleries group, choose Site Content Types
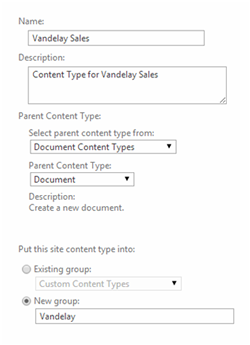
- Click Create. Name your content type Vandelay Sales, and give it a description.
- Select “Document Content Types” for the parent and choose Document for the Parent Content Type. Then create a new group for this content type called Vandelay, and click OK.
We’ve just created our parent content type for Vandelay sales and a group called Vandelay. If you go back to the Site Content Types screen and choose Vandelay in the drop down by “Show Group:” you’ll see only the Vandelay Sales content type.
We now need to create content types for each type of document in Vandelay Sales.
- From the Site Content Types screen, click “Create”.
- Name this content type “Vandelay Work Order”, type a brief description, select Vandelay for the group and Vandelay Sales for the Parent Content Type.
- Put this new content type in the Vandelay group and click OK.
Repeat these steps to create Contract, Status Report, and Non-Disclosure Agreement content types.
Create a document set
Our next step is to create the Project Folder document set. A document set is a content type for a folder, so we’ll start in the Site Content Types screen again.
 Click create and name this new content type, “Vandelay Project Folder”. Give it a description and choose “Document Set Content Types for the parent and Document Set for the Parent Content Type. Put it in the Vandelay group and click ok.
- From the administration screen for the Vandealy Project Folder content type, choose, “Document Set settings”.
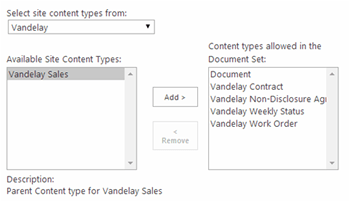
- Choose Vandelay from the groups drop down and only the Vandelay content types will appear in the list below. Choose everything except for Vandelay Sales and click Add.
- There are a lot of interesting options on this page, but just click OK at the bottom.
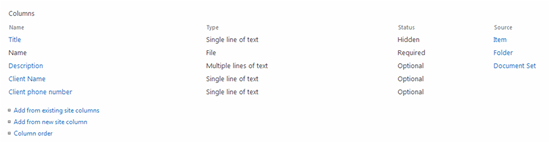
We now want to add some standard metadata that will populate throughout the documents. Every Project has a client, client’s phone number, and project manager, so let’s add those columns to this content type.
From the Vandelay Projects Document Set Content Type Settings Page (which should be the page you’re on after completing the last step), click on “Add from new site column” in the columns section.
This form will create a site column which is just like a regular column except that it is available all over the site and any sub-sites.
Name the column Project Manager and choose Choice for the type. For the choices I added “(Choose One), Tom, Pete, Sam” Making (Choose One) the default. Click ok, and add columns for Client Name and phone number in the same way.
When you’re finished adding columns, click on Document Set settings in the Vandelay Projects Document Set Site Content Type Settings Page (That is a lot to say!).
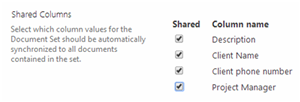 You’ll now see your site columns listed in the Shared Columns section. Check each box to share them. This will make the contents of the site columns for the document set populate or share down to the document level. Now click Ok.
Creating a Content Type Template
At this point each of our 4 content types (or 5 counting the parent) has the same template of a blank Word document. We’ll need to customize each of these templates to be a little more useful.
- Open Microsoft Word and build a simple template for a work order. I used one of the standard Work Order templates in Word. When you’re finished, save it to your desktop.
- Find the Vandelay Work Order content type on the Site Content Types screen and click on it.
- Click on Advanced Settings. Choose the radial button “Upload a new document template:” and find your Word template. Click Ok.
Repeat these steps for each of the other four content types.
Using the document set
Now that we’ve created all of our content types, we need a document library to house all of our data. Content types can be reused many times in many different document libraries, but for our purposes, we’ll just create a single library called Vandelay Projects.
- Click on Site Contents and choose New App. Select a document library, give it a name and click ok. Then open the setting screen for the new document library.
- Under Advanced Settings, change the radial button for “Allow management of content types” to Yes, and click ok.
- The Content Types section will appear on the document library settings page. Click “Add from existing site content types”. Select just the Vandelay Project Folder and click ok.
The document library, document set, and document templates are ready to use.
- Open the document library, click on “New document” under the “Files” tab and choose Vandelay Project Folder.
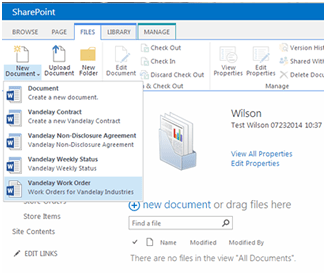 Give your project folder a name and description and click Save. The new document set will open.
- Click on File at the top and click on new. You can then select any of the four templates we created.
Populating the name of the client in the templates.
Presumably every document in the project folder is related to the client named in the document set. SharePoint will let you pass that variable through to the templates, so that you no longer have to type it into every document.
Using QuickParts in Word, metadata from the SharePoint Document Set in which a document is stored can be populated into the Word document.
- Start by opening the template in which you want the data populated. Open it from the file menu in the SharePoint Document Set to ensure the file is properly associated with that document set.
- Put your cursor in the place you want the client’s name to appear.
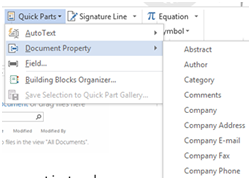
 Under the Insert tab, click on Quick Parts and hover over Document Properties. Client’s name or any other metadata you have associated with the document should be available there. Select Client’s Name and repeat for any other fields you want on the form.
- Now save your template file to your local hard drive.
You now have a template that references the correct metadata. The next step is to replace the existing template with this new one.
- Navigate to the Content Type settings screen for the type of document you just created.
- Click on Advanced Settings
- Choose Upload a new document template and choose the file you just created.
Now when you create a new Document Set for a new project, and you create a new Work Order, the fields will populate with the appropriate client information upon saving the document.
