 Frankly, users cannot always be trusted to save documents in the proper libraries. Even with simple taxonomies, mistakes can be made.
These misplaced documents can be a real problem, so Microsoft created the SharePoint Content Organizer feature to get everything where it needs to go.
SharePoint Content Organizer automatically routes documents to their proper folders based on content types and properties.
Some Ideas for Using Content Organizer
There are a number of ways you can use Content Organizer to simplify the lives of your users. Here are a few scenarios:
- The HR Content Organizer – Instead of asking users to submit each HR form in its appropriate library, create one inbox for all HR forms and use Content Organizer to get everything in its correct place.
- Scanning- Automatically route scans to their correct location without having to drill down to the right library with the scanner.
- OneDrive- Instead of looking through every document library and folder to find the right place to save your document, use the drop off library with OneDrive for automatic routing.
- Manage Folder Size- Content Organizer can automatically create folders if a library gets too large.
- Eliminate duplicates- If duplicate items are submitted, Content Organizer will save each document as a new version.
Enabling Content Organizer
By default, Content Organizer is not enabled on new sites, so you need to first activate it in the site features.
- Go to the top site level that will need site organizer. Click on the wheel and choose Site Settings.
- Scroll down to Content Organizer and click Activate.
- Back in Site Settings you’ll now see two new options- Content Organizer Settings and Content Organizer Rules.
 Once you enable Content Organizer, you’ll notice a new document library called the “Drop Off Library.” Placing documents in this library will trigger Content Organizer.
Content Organizer Settings
There is a good explanation of the Content Organizer Settings on this Microsoft page.
Content Organizer Rules
Content Organizer can be controlled by any number of rules that determine which documents should be routed where.
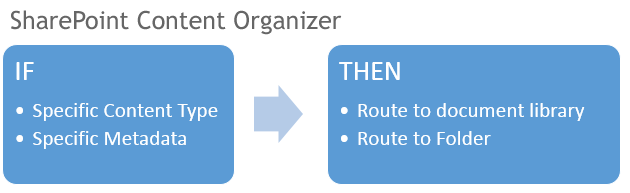
Content Organizer rules have two parts- the IF, and the THEN. IF a file matches this content type and possibly has this metadata, THEN route it to this document library or this folder within the document library.
To get started, click on Content Organizer Rules under site settings. Add a new item to the list. You’ll have these controls:
- Rule Name- Name the rule

- Rule Status and Priority- The priority addresses times when two or more rules apply to the same document. The rule with the highest priority will be applied.
- Submissions Content Type- This is the IF part of the equation. Select the Content type to which this rule will apply.
- Conditions- If applicable, choose the conditions that the properties (columns, metadata) must meet for the rule to apply.
- Target Location- This is the THEN part of the equation. Where should the document go?
Of course, rules require a little experimentation, but with some patience, they can become a very important part of how you manage content in SharePoint.

[…] the Blogosphere SharePoint 2013 Content Organizer (Steven A Nichols) Frankly, users cannot always be trusted to save documents in the proper […]