SharePoint Content Types can be used to create templates for commonly used documents. Expense reports, new 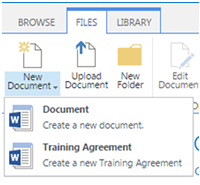 agreements, or any other standard document based on a template can be saved as a content type in SharePoint with custom metadata and workflows.
Once a content type is associated with a document library, creating a new instance of the document is as simple as using the drop down under New Document in the Files tab.
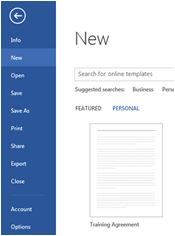
Microsoft Office also offers custom templates that serve a similar purpose. Save a document as a document template in your templates folder, and you can quickly access it to create a new document. (Just click File > New > PERSONAL.)
 Accessing content types from Office templates

Accessing content types from Office (specifically Word) is a little tricky.
A content type document needs to be saved on the SharePoint site, but a Word template needs to be saved on the local drive. The trick to connecting these two is OneDrive for Business.
Create a content type
Start by saving your template on the SharePoint site. Any document library is fine, though I’d recommend using a folder within that document library that just contains templates to help keep things organized.
Once your template is saved, Click on the ellipses next to the file and copy the direct link to the document.
Next, click on the gear and choose Site Settings. Click Site Content Types and then Create. Give your content type a logical name. Choose “Document Content Types” and “Document” for the parent content types. Select the “Custom Content Types” for the group and click ok.
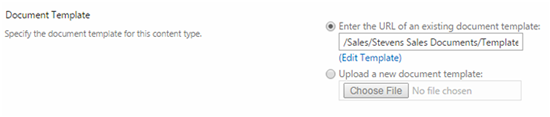
The next screen will be the detail for your new content type. Choose Advanced Settings and paste the link to your template box labeled, “Enter the URL of an existing document template:” Click Ok.
You’ve just created your content type.
Using your Content Type
The next step is to associate that content type with the document library. You can use any document library. The template file for the content type does not need to be in the same document library in which it is used.
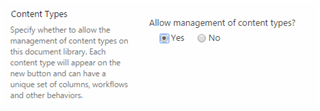 We first have to allow the library to accept new content types. Open your document library. Under the Library tab, choose Library Settings. Then, click on Advanced Settings. Change the radial button to Yes for “Allow management of content types?”. Click OK at the bottom.
When you’re back in the library settings screen, scroll down a little to the Content Types section that just appeared. Click “Add from existing content types”. Add your new content type and click ok. Return to the document library.
You can now use the drop down under New to select your content type.
Adding your content type to Word
The next step is to make your content type available in Word or any other Office program. To do this, you’ll need to have OneDrive for Business installed.
 OneDrive for Business has a lot of great features, the most important of which is that it allows you to interact (Open, Save, Share) with SharePoint documents from within Office. OneDrive for business can monitor folders on your local machine and sync them up with their matching folders in SharePoint.
OneDrive is an inherent part of Office 2013. You just have to set it up. If you have Office 2010, you need to download the free plugin.
Assuming OneDrive for Business is already setup, you now need to sync the document library and folder containing your template to a local folder.
![]() Simply navigate to the right document library and click Sync in the top right hand corner. Follow the prompts and that document library will now be available in your favorites.
Simply navigate to the right document library and click Sync in the top right hand corner. Follow the prompts and that document library will now be available in your favorites.
Open Word, or whatever Office program you use with your template, and click File > Options. Choose “Save” on the left, and about halfway down the window, you’ll see “Default personal templates location:” Simply type in the path of your new OneDrive for Business folder and click OK. If you don’t know the path, use the Browse button for “Default local file location” to find it, and then copy the path into the other field.
![]()
The next time you want to use that template, click File > New > PERSONAL and select the template.
